
Master the ultimate tuxedo cake recipe with three distinct chocolate mousses. Professional techniques for creating this sophisticated dessert
The Night I Served Perfection on a Plate
There’s a moment in every serious baker’s journey when you realize you’ve transcended from simply following recipes to creating edible art. Mine came on a particularly nerve-wracking evening when I was tasked with creating dessert for my culinary school’s annual black-tie fundraiser. The pressure was immense – 150 of the city’s most discerning palates, including several Michelin-starred chefs, would be judging my skills with their forks.
I remember standing in the pastry kitchen at 2 AM, carefully spooning the final layer of white chocolate mousse onto what would become my signature tuxedo cake recipe. The silence was broken only by the gentle hum of the walk-in cooler and my own nervous breathing. As I smoothed the surface with a palette knife, watching the ivory mousse catch the fluorescent light, I felt something shift. This wasn’t just a dessert anymore – it was three days of meticulous preparation, temperature calculations, and an almost obsessive attention to detail culminating in something that would either make or break my reputation.
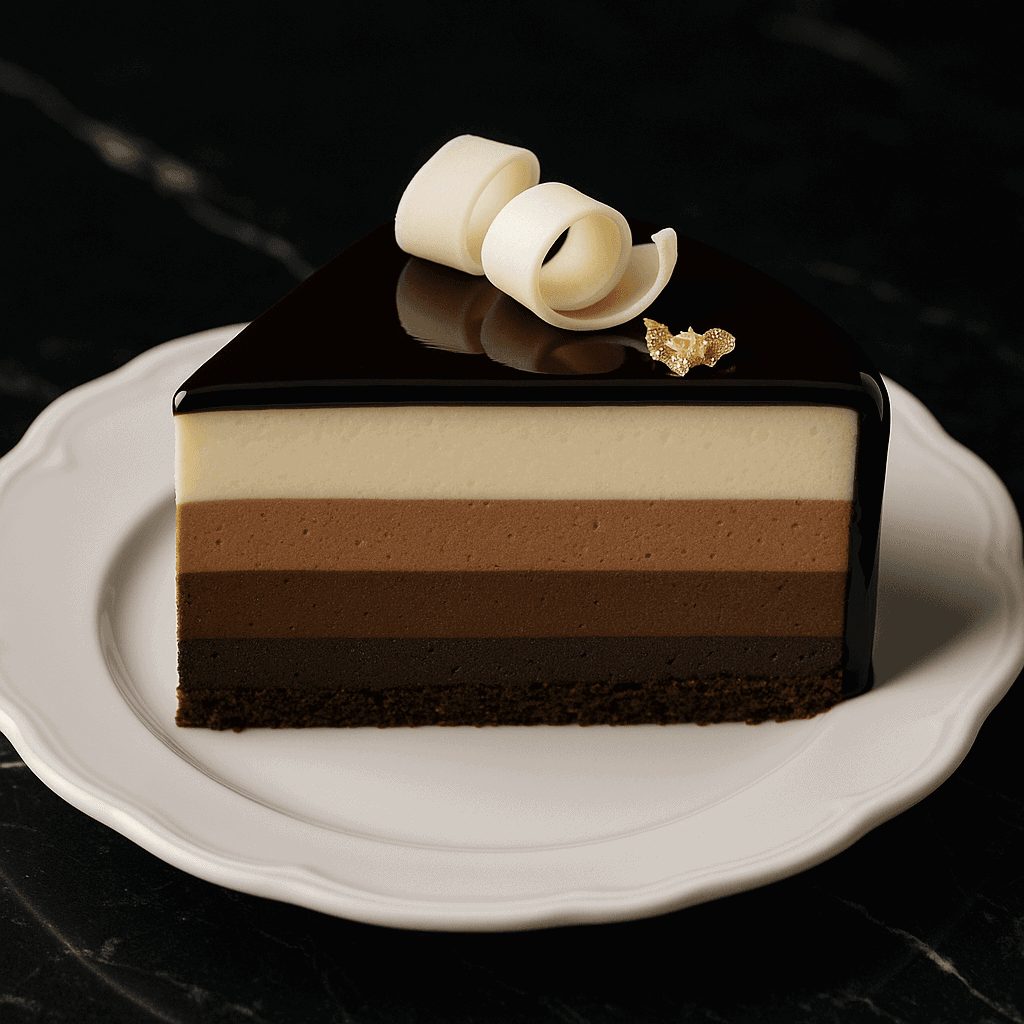
The evening of the event, I watched from the kitchen doorway as each elegant slice was placed before the guests. The cake’s layers were perfectly distinct – dark chocolate mousse at the base, rich milk chocolate in the middle, and that pristine white chocolate crown, all sitting atop a tender chocolate cake foundation and crowned with a mirror-like glaze that reflected the candlelight. When the room fell silent except for the gentle clink of forks against plates, I knew I had achieved something extraordinary.
Tonight, I’m going to share every hard-won secret, every temperature-critical moment, and every professional technique that transforms this complex dessert from ambitious attempt to guaranteed masterpiece.
My Journey to Tuxedo Cake Mastery
Let me be brutally honest: this cake humbled me. After conquering croissants, perfecting macarons, and mastering soufflés, I thought I understood the language of precision baking. But tuxedo cake – this sophisticated symphony of three distinct chocolate mousses – taught me that true pastry mastery requires a different kind of patience and obsession with detail.
My first attempt was a disaster. The mousses mixed together into a muddy brown mess, the gelatin seized into rubber chunks, and the mirror glaze looked more like chocolate soup than a glossy finish. I literally threw the entire thing in the trash at 1 AM and cried in my kitchen. But that failure ignited something in me – a determination to understand not just the how, but the why behind every technique.
Over the next six months, I made this cake 47 times. Yes, I counted. Each attempt taught me something new about chocolate behavior, gelatin ratios, temperature control, and the delicate balance required to create three distinct mousse layers that remain separate yet harmonious. I learned that dark chocolate mousse needs to be cooler when applied to prevent melting the base, that milk chocolate requires extra stabilization to maintain its creamy texture, and that white chocolate mousse is the most temperamental of all – demanding near-perfect temperature control to prevent seizing.
What makes this cake extraordinary isn’t just its visual impact, though the black-and-white elegance is undeniably stunning. It’s the way each spoonful delivers a different chocolate experience: the intense, almost bitter complexity of the dark chocolate base, the creamy comfort of the milk chocolate middle, and the delicate sweetness of the white chocolate top. Together, they create what I call “chocolate architecture” – a deliberate building of flavors that reveals itself in layers.
What Makes This Tuxedo Cake Extraordinary
The name “tuxedo cake” isn’t just marketing – it’s a promise. Like a perfectly tailored tuxedo, this dessert embodies sophistication, attention to detail, and an understanding that true elegance comes from mastering the fundamentals. The black and white color scheme isn’t accidental; it’s a visual metaphor for the contrast and harmony that makes this cake work.
After years of perfecting this recipe, I’ve come to understand that the magic lies in the interplay between the three mousses. Each layer must be distinct enough to maintain its own character while being complementary enough to create a cohesive whole. The dark chocolate provides the foundation – robust, slightly bitter, with enough intensity to anchor the entire dessert. The milk chocolate serves as the bridge, offering familiarity and comfort while adding richness without overwhelming sweetness. The white chocolate crown is pure luxury – delicate, creamy, and subtly sweet, providing the perfect counterpoint to the intensity below.
The technique required to achieve this harmony is what separates amateur attempts from professional results. It’s not enough to simply layer three chocolate mousses; you must understand how temperature, timing, and gelatin ratios affect each layer’s ability to set properly while maintaining its distinct character. This is pastry physics at its most elegant.
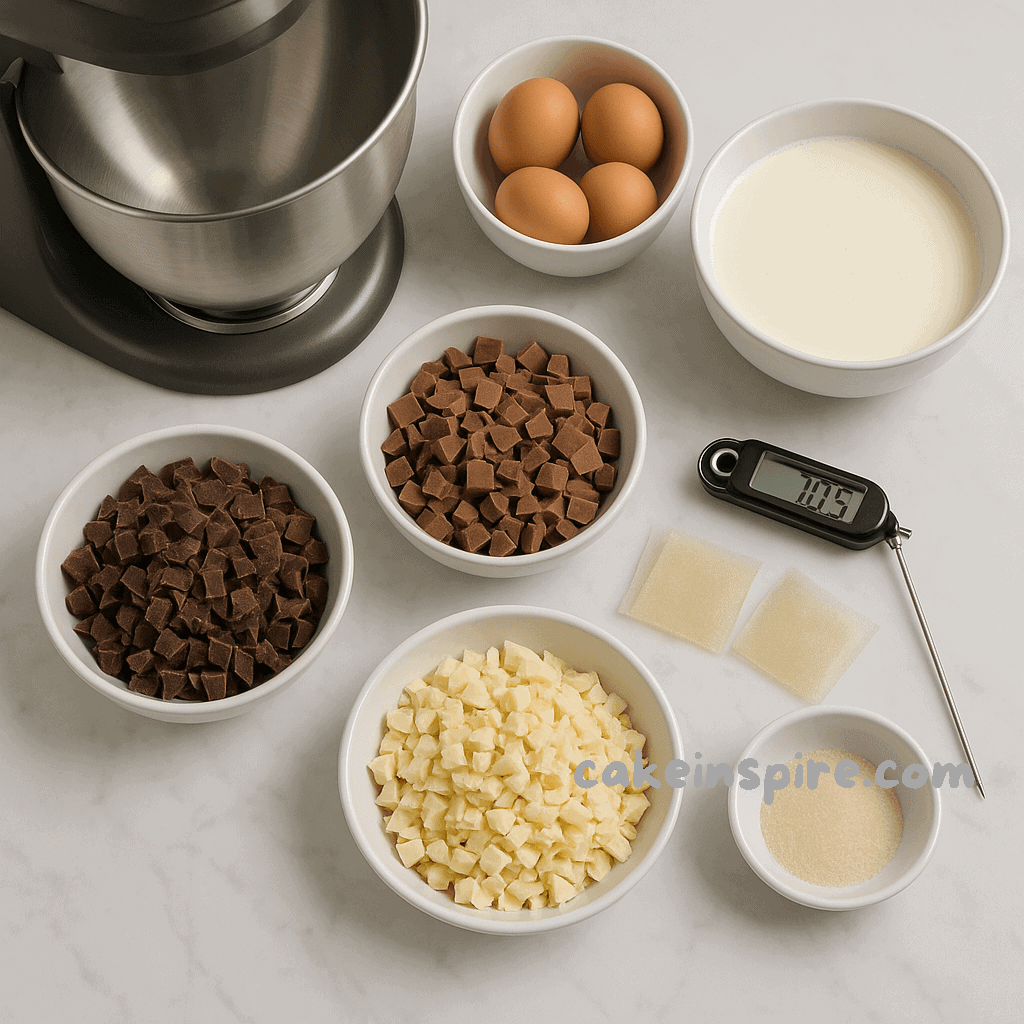
Ingredients: The Foundation of Excellence
The quality of your ingredients will determine the success of this cake more than any other factor. After testing dozens of chocolate brands and ratios, I’ve developed specific requirements for each component.
For the Chocolate Cake Base:
- 1 cup all-purpose flour (I prefer King Arthur for its consistent protein content)
- 1 cup granulated sugar
- ½ cup unsweetened cocoa powder (Valrhona Dutch-processed – worth every penny)
- 1 teaspoon baking powder
- ½ teaspoon baking soda
- ½ teaspoon salt
- 1 large egg (room temperature)
- ½ cup buttermilk
- ½ cup strong hot coffee (this intensifies the chocolate flavor)
- ⅓ cup vegetable oil
- 1 teaspoon vanilla extract (Madagascar vanilla only)
For the Dark Chocolate Mousse:
- 8 oz dark chocolate, 70-85% cacao (I use Guittard or Callebaut), chopped fine
- 6 large egg yolks
- ⅓ cup granulated sugar
- 2 cups heavy cream (35% fat minimum), divided
- 2 tablespoons unflavored gelatin (Knox works perfectly)
- ¼ cup cold water
For the Milk Chocolate Mousse:
- 8 oz high-quality milk chocolate (Valrhona Jivara 40%), chopped fine
- 4 large egg yolks
- ¼ cup granulated sugar
- 1½ cups heavy cream, divided
- 1½ tablespoons unflavored gelatin
- 3 tablespoons cold water
For the White Chocolate Mousse:
- 8 oz premium white chocolate (Callebaut or Valrhona Ivoire), chopped fine
- 4 large egg yolks
- ¼ cup granulated sugar
- 1½ cups heavy cream, divided
- 1½ tablespoons unflavored gelatin
- 3 tablespoons cold water
For the Chocolate Mirror Glaze:
- ½ cup heavy cream
- 6 oz dark chocolate (same as mousse), finely chopped
- 2 tablespoons light corn syrup
- 1 tablespoon unsalted butter
For Garnish:
- White chocolate curls or shavings
- Dark chocolate decorations
- Optional: gold leaf for special occasions
Master-Level Step-by-Step Instructions
This is a four-day process. Don’t rush it – the staggered timeline allows each layer to set properly while maintaining distinct textures.
Day 1: Foundation and Dark Chocolate Mastery
Cake Base (Morning):
- Preheat oven to 350°F. Line a 9-inch springform pan with parchment, grease sides thoroughly.
- Whisk all dry ingredients in a large bowl until completely combined.
- In separate bowl, whisk egg, buttermilk, hot coffee, oil, and vanilla until smooth.
- Pour wet ingredients into dry, whisking until just combined. The batter will be thin – this is correct.
- Pour into prepared pan, bake 25-30 minutes until toothpick comes out with just a few moist crumbs.
- Cool completely in pan. The cake will be your foundation, so it must be completely stable.
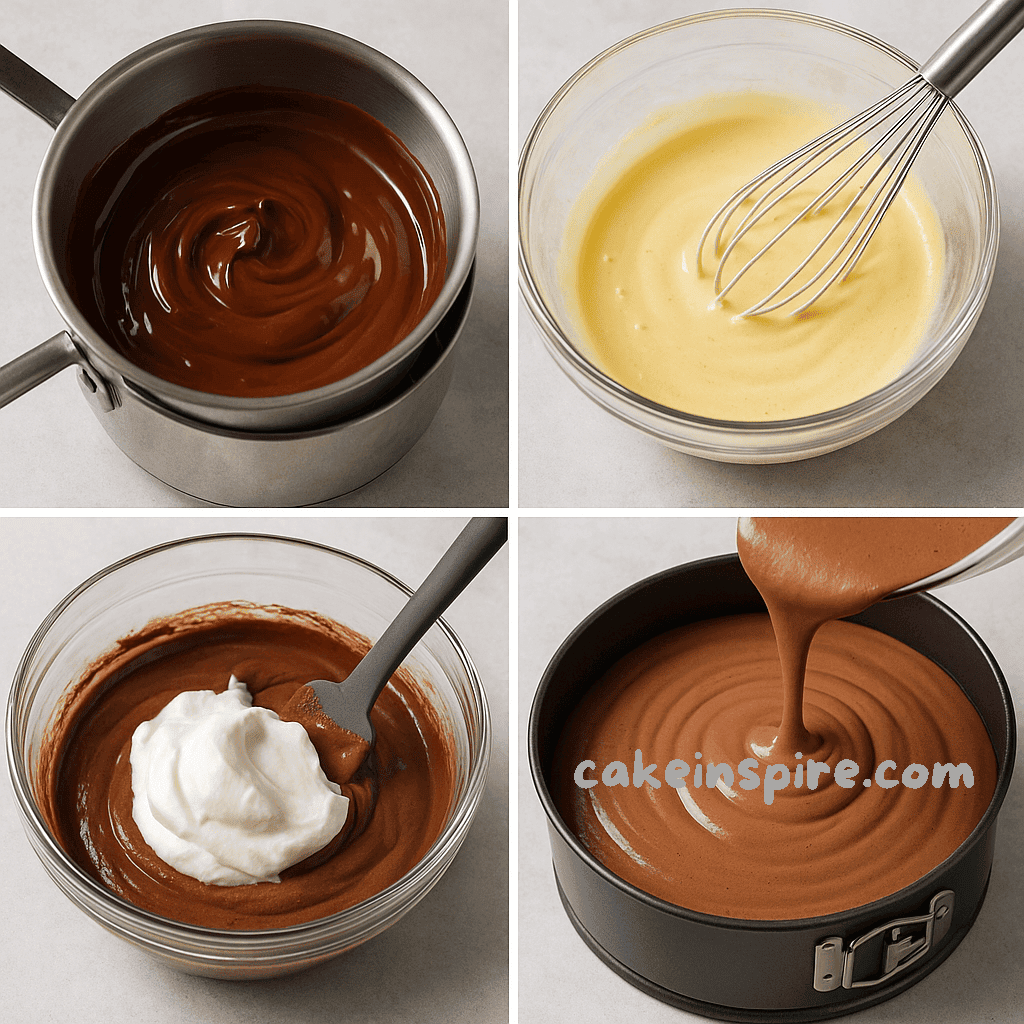
Dark Chocolate Mousse (Evening):
- Bloom gelatin in cold water for 5 minutes until spongy.
- Melt chocolate in double boiler until smooth, remove from heat, cool to 90°F.
- Whisk egg yolks and sugar until pale and ribbony, about 3 minutes.
- Heat ½ cup cream to just under boiling, slowly whisk into yolk mixture to temper.
- Return to heat, cook while stirring until mixture coats spoon (170°F on thermometer).
- Whisk in bloomed gelatin until dissolved, then whisk mixture into cooled chocolate.
- Whip remaining 1½ cups cream to soft peaks, fold ⅓ into chocolate mixture to lighten, then fold in remaining cream in two additions.
- Pour over cooled cake base, smooth surface. Refrigerate overnight.
Critical Temperature Note: The chocolate mixture must be below 85°F when folding in whipped cream, or it will seize.
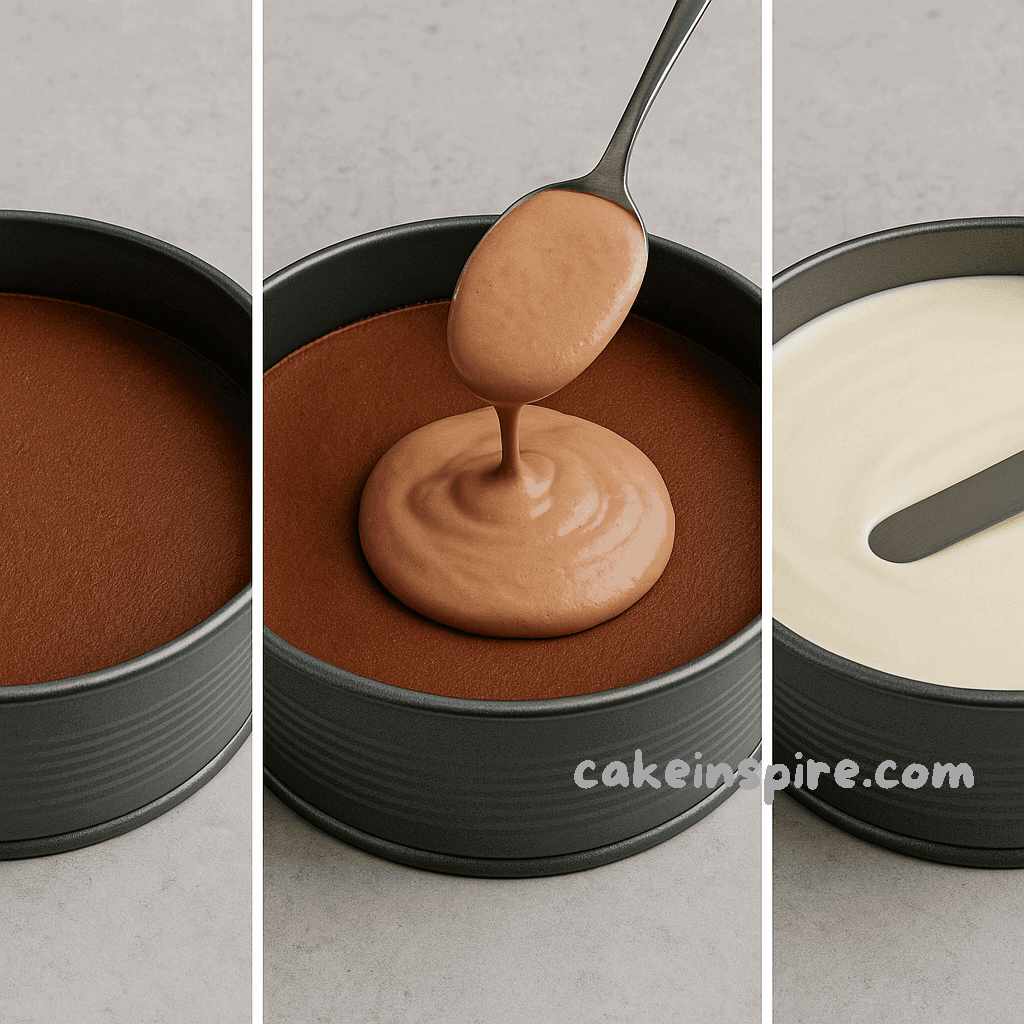
Day 2: Milk Chocolate Harmony
Milk Chocolate Mousse:
- Repeat gelatin blooming process with 1½ tablespoons gelatin and 3 tablespoons cold water.
- Melt milk chocolate to 88°F (lower than dark chocolate due to milk solids).
- Prepare custard base with 4 egg yolks, ¼ cup sugar, and ½ cup heated cream.
- Temper, cook to 165°F, add gelatin, incorporate into chocolate.
- Whip 1 cup cream to soft peaks, fold into chocolate mixture.
- Gently spoon over set dark chocolate layer, spreading carefully to avoid disturbing the base.
- Refrigerate 4-6 hours until completely set.
Professional Tip: Use a large spoon to dollop the mousse, then spread gently with an offset spatula. Never pour directly onto the previous layer.
Day 3: White Chocolate Perfection
White Chocolate Mousse:
- This is the most temperamental layer. Work in a cool kitchen if possible.
- Bloom gelatin as before.
- Melt white chocolate to exactly 85°F – any hotter and it will seize with the cream.
- Prepare custard base, cooking only to 160°F (lower than previous layers).
- Add gelatin, incorporate into white chocolate very slowly.
- Whip cream to soft peaks, fold in carefully.
- Spread over milk chocolate layer, creating a perfectly smooth surface.
- Refrigerate overnight for complete stabilization.
Critical Success Factor: White chocolate contains more milk solids and is more prone to seizing. Temperature control is everything.
Day 4: Mirror Glaze and Final Glory
Mirror Glaze:
- Heat cream until just steaming, pour over chopped chocolate.
- Let sit 2 minutes, then whisk from center outward until smooth.
- Whisk in corn syrup and butter until glossy.
- Cool to exactly 90°F before using – use a thermometer.
- Pour over center of cake, allow to flow naturally to edges.
- Use offset spatula to encourage even coverage if needed.
Final Assembly:
- Carefully remove from springform pan using a torch to warm the sides if needed.
- Add white chocolate curls and dark chocolate decorations while glaze is still soft.
- Chill 2 hours before serving to allow glaze to set completely.
Professional Techniques & Hard-Won Expertise
Temperature is Everything: I learned this lesson after countless failures. Each chocolate has an optimal melting and working temperature. Dark chocolate can handle more heat, milk chocolate needs gentler treatment, and white chocolate is incredibly finicky. I now keep three thermometers in my kitchen – one for each chocolate type.
The Gelatin Game-Changer: Standard recipes often under-gelatin the mousses, leading to layers that blend together. My ratios are higher than most because I learned that slight over-stabilization is better than under-stabilization. The texture remains silky while maintaining structural integrity.
Folding Technique Mastery: When incorporating whipped cream into chocolate mixtures, I always fold in one-third first to lighten the base, then add the remaining cream in two additions. This prevents deflation while ensuring complete incorporation.
The Cooling Trick: Between each layer, I place the cake in the freezer for 15 minutes, then move to refrigerator. This flash-cooling prevents the new layer from melting the previous one while allowing proper setting.
Professional Equipment Worth the Investment:
- A digital thermometer with a probe
- Offset spatulas in multiple sizes
- A springform pan with perfectly straight sides
- A stand mixer with a cooling bowl attachment
Troubleshooting Complex Disasters
Mousse Layers Bleeding Together: This happens when the previous layer isn’t completely set or the new layer is too warm. Always test the surface of the previous layer with a gentle finger touch – it should feel completely firm. If a layer is too warm, cool it over an ice bath while stirring gently.
Gelatin Seizing: This occurs when gelatin is added to mixtures that are too hot. Always cool chocolate mixtures below 85°F before adding gelatin. If seizing occurs, try placing the bowl over barely simmering water and whisking vigorously – sometimes you can save it.
Mirror Glaze Issues: Too thick means it was too cool when applied. Too thin means it was too hot. The sweet spot is 88-92°F. If it’s too thick, gently rewarm. If too thin, let it cool while stirring.
Unmolding Disasters: Always line your springform pan with parchment extending up the sides. Before unmolding, run a thin knife around the edges, then use a torch to gently warm the pan sides. The cake should release cleanly.
Advanced Variations & Personal Innovations
Seasonal Adaptations:
- Holiday Version: Add a pinch of peppermint extract to the white chocolate mousse and garnish with crushed candy canes
- Summer Elegant: Incorporate raspberry purée into the milk chocolate layer for a subtle fruit note
- Anniversary Special: Add a tablespoon of Grand Marnier to the dark chocolate mousse
Chocolate Percentage Experiments: After extensive testing, I found that 75% dark chocolate provides the perfect balance of intensity and sweetness. Lower percentages lack complexity; higher percentages can overpower the other layers.
My Signature Presentation: I serve this on chilled plates with a drizzle of raspberry coulis and a single gold leaf for special occasions. The temperature contrast between the chilled cake and room-temperature plate creates an elegant condensation effect.
Storage and Make-Ahead Mastery
Professional Storage: This cake actually improves with time. The flavors meld beautifully over 2-3 days. Store covered in refrigerator up to 5 days.
Transportation Tips: For special events, transport in the springform pan, unmold at destination. Keep chilled until 30 minutes before serving.
Freezing Capabilities: The cake base can be frozen wrapped for up to 3 months. Complete mousses can be frozen for up to 1 month, though texture may be slightly different upon thawing.
Timeline Management: Start cake base on Monday for Friday service. This allows proper setting time and flavor development while managing your schedule.
Nutritional Information & Serving Guidelines
Serves: 12-14 generous portions (this is a rich dessert)
Calories per slice: Approximately 680 calories
Total preparation time: 4 days (30 minutes active time per day)
Complexity level: 9/10 (advanced technique required)
Optimal serving temperature: 45-50°F (remove from refrigerator 20 minutes before serving)
Expert FAQ Section
Can I make this without a springform pan? Technically yes, but I strongly advise against it. The springform pan allows clean unmolding without disturbing the delicate layers. A regular cake pan makes this process nearly impossible without damage.
How do I achieve restaurant-quality mirror glaze? Temperature control and quality ingredients. Use a thermometer, don’t rush the cooling process, and invest in good chocolate. The glaze should coat the back of a spoon but still flow freely.
What’s the ideal serving temperature? Between 45-50°F. Too cold and the mousses lose their creamy texture; too warm and the layers may become unstable. Remove from refrigerator 20 minutes before serving.
How do I prevent mousses from separating? Proper gelatin ratios and temperature control. Each mousse should be barely warm when applied, and the previous layer should be completely set. Rush this process and you’ll get separation.
Can I substitute different chocolate brands? Quality matters enormously. Stick with couverture chocolate (Valrhona, Callebaut, Guittard) for best results. Chocolate chips or baking chocolate won’t provide the same smooth texture or complex flavor.
The Mastery Moment
Creating a perfect tuxedo cake is about more than following instructions – it’s about understanding the science behind the art. Every time I make this cake, I’m reminded of why I fell in love with pastry in the first place. It’s the marriage of technique and creativity, precision and passion, that transforms simple ingredients into something extraordinary.
The satisfaction of slicing through those perfect layers, seeing the distinct mousses hold their shape while melding harmoniously on the palate, never gets old. This isn’t just a dessert; it’s a statement. It says you understand that some things are worth doing right, that elegance requires effort, and that true mastery comes from respecting both the process and the ingredients.
When you serve this tuxedo cake recipe, you’re not just offering dessert – you’re sharing a piece of culinary artistry that represents hours of careful preparation and years of accumulated knowledge. The gasps of delight from your guests, the way conversation stops as they savor each bite, the requests for the recipe that you’ll smile and say requires a conversation over coffee – these are the moments that make every challenging step worthwhile.
I’d love to see your tuxedo cake masterpiece when you conquer this technique! Tag me in your photos and share your journey – the triumphs, the challenges, and that moment when you realize you’ve created something truly spectacular. This is advanced baking at its finest, and you’re ready for the challenge.
Now go forth and create something extraordinary.